Corporate Wellness Services
FitnessSyncer can aggregate health and fitness data from various devices — and continuously adding more — making it an ideal platform for researchers, corporate wellness programs, and similar use-cases. Independent of the devices, we can provide the data to you in a uniform, consistent format.
This page provides documentation for some of the commonly used services for Enterprise Users. If you are looking for something not mentioned here, contact us and we can assist.
Adding Participants
There are multiple ways of connecting your users to FitnessSyncer for your corporate wellness program, depending on how you wish to use our platform. Our representatives can help you select the best approach for your project.
Individual accounts per participant
Send new participants the link we have provided to you. Once they click the link, the application will guide them through setting up their accounts, sharing the data with you, and adding new sources.
If the service requires the user to authenticate in their own account, we will notify them. You can also bulk-add new users using your Account’s Bulk Add option, which accepts a CSV file or pasted data and will invite users and guide them through the process. Please ensure that your Display Name is properly set in your profile, as it is used to identify your organization.
Single managed account
If you manage a single account containing all devices, you can add services manually; our Getting Started Documentation may help. You may wish to use a private or incognito browser window per participant to properly authenticate each individual user.
Once you have one sample configuration set up, you can bulk-add participants by uploading a CSV with the following columns:
- Column 1: E-mail address to notify the user if required.
- Column 2: Display name. This can be omitted.
- Column 3: For services that use a serial number or identifier (such as BodyTrace), the identifier. For services that use a username and password, the username.
- Column 4: For services that use a username and password, the password.
- Column 5: Group for this new user.
Configuration Wizard
For organizations that have elected to have each user have their own FitnessSyncer account, you can configure a wizard to help the end-users configure their account. Our representatives can help you configure this.
Our basic wizard will provide you with a link to share with your participants. When your participant clicks on the link, they will get a page that looks like this. All the text in the red sections is available for customization.
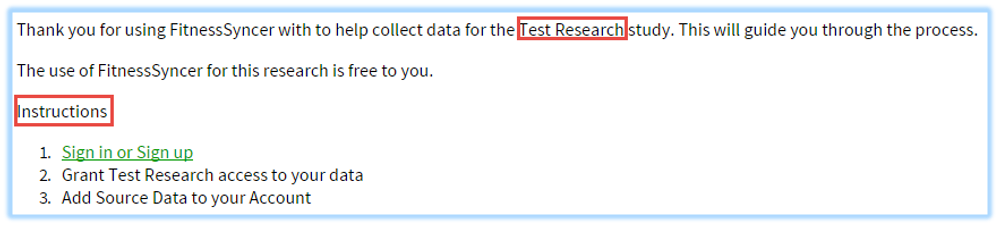
Once the participant has created their account, they will need to provide consent to share their information with your organization:
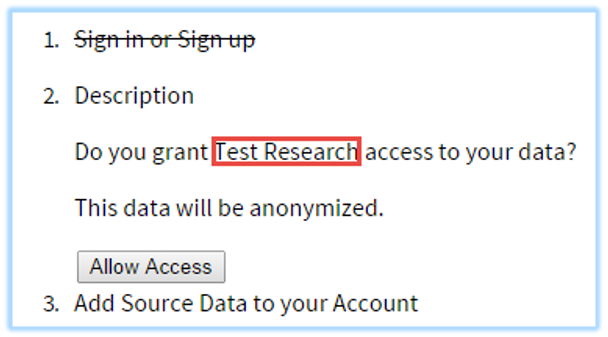
Once that is complete, they can start to add sources to their account, either automatically based on your defaults or based on their preferences.
Participants can opt out by removing your access under the Sharing section of My Account.
Filtering Data for Participants
From the toolbar on the Dashboard, you will see a drop-down where you can select the user profiles or sources you wish to see the data for at this time.
PDF Report Generation
FitnessSyncer can e-mail you a PDF-based report based on one of your dashboards for each user you have subscribed to the service.
To configure this:
- From My Account, add a new Destination Task
- Change the Type to “Enterprise PDF Export”
- Choose the frequency and default Report to send
- Save
This will then run at the scheduled time and send you copies of the PDF.
Sharing Dashboards
When you edit Dashboards, there is an option to Share the Dashboard with your participants. When shared, your participants will be allowed to view their data in the shared Dashboard. Edits that they make to this dashboard would go into their account and not be shared back.
Exporting Dashboards
All the data on a given dashboard may be exported to Excel format by clicking the icon in the toolbar. Each chart will be on its worksheet in the resulting file.
It should be noted that charts that do not support exporting to a CSV will not be represented. Also, any chart whose data is beyond the limitations of Excel 2007 and above may be capped at the limitation; for such charts, the individual CSV export is the best way to get all the data.
Adding your Logo to the Dashboard
To add your logo to the Dashboard:
- From the Dashboard, open the report you wish to customize.
- Click the Gear from the toolbar
- From the new Chart Picker, select “Section Title” and click Add
- Scroll to the newly added component, click the green gear of the new section title, and select Properties
- In the URL field, type in your full image URL for your logo and click Apply
- If your logo is not at the location you wish it to be, click and drag it to where you would like it to be
- Save the report
Downloading CSV Data
You can download generated CSV data from the bottom of the My Account page, where you will find links for:
- Download CSV: Single CSV file for the selected data type, with summary heart rate information.
- Download ZIP of CSV files (Recommended): ZIP file with one CSV per participant, with summary heart rate information.
- Download CSV (Summary Pulses): Single CSV file for the selected data type, with complete heart rate information.
- Download ZIP of CSV (Summary Pulses): ZIP file with one CSV per participant, with complete heart rate information.
- Download CSV (CSV By Hour): Single CSV file for the selected data type, with heart rate summarized per hour.
- Delete All Data: Permanently deletes all data for the selected type. This cannot be undone, and you will incur additional fees if you require that data.
Data Freshness
FitnessSyncer provides various data freshness options, depending on the underlying data source. The most common are:
- Hourly (24 hours a day or a specific schedule)
- Daily
- Weekly
It should be noted that devices must have synchronized to the app or computer and then synchronized to the provider’s website for us to access it.
Preloaded Reports
As part of your Corporate Wellness Package, you can view Dashboards for each of your participants. Instead of loading the reports in realtime, Corporate Wellness organizations can elect to have preloaded Dashboards.
The way that this works is that on a predefined schedule, FitnessSyncer will automatically build a cached version of your Dashboards so that you can load the dashboards quickly. This can save some valuable time for large organizations with many participants.
To enable this feature, please contact us.
API Access
API access is available for our corporate wellness organizations. Refer to the API documentation or contact us to get started.
User Billing
FitnessSyncer charges per account under management. We will automatically increase your account as needed, and you can see the current number of accounts you are paying for under the Subscription section in My Account.
To remove accounts, you will need to contact us.