Get started with FitnessSyncer
You can get started with FitnessSyncer in 3 easy steps!
Create Your Account
Getting started with FitnessSyncer is easy. Here are the steps required:
- If you do not already have an account, create a free account.
- We recommend first setting your Time Zone. From the Accounts page, select Profile, select General (on the web) or Time Zone (in the app), and adjust.
Once that is done, you add sources for your data. It’s pretty simple. If it seems complicated, How FitnessSyncer Works is an excellent introduction, and of course, we are here to help.
Adding Sources
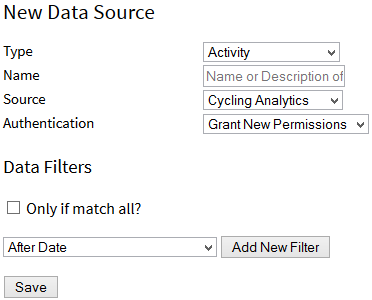
Start by adding in your sources using these steps:
- On the Accounts page, click Add New Source .
- Select the Data Type you wish to read from the drop-down menu, such as Activity, Blood Pressure, Body Composition, Sleep, etc. Remember that FitnessSyncer will only read this type of data for this source, and if you want to read the other types, you will need to add another source.
- Select the Source for the data from the list. For Apple Health, you will need to do this from FitnessSyncer for iOS; for Samsung Health or Google Health Connect, you will need to do this from FitnessSyncer for Android.
- There is an that will show up for many (but not all) sources; this will answer any common questions and limitations with the integration.
- Depending on the source, you may need to enter your username and password for that service here, or you may be redirected to the device or service’s website after saving the item to grant FitnessSyncer access to your information.
- Click the Save button. All other properties are not required, but you can learn more about them in Sources.
You can now click the Sync button to pull in your data. Depending on how much data you have, this may take some time. You may wish to refer to any specific documentation for the service you are synchronizing for any particular information or get familiar with the service under our how it works section.
Once your data is available, navigate to our Dashboard or Stream to see your data.
If you do not have any accounts at any of our supported health and fitness apps and services, you can always use our Notebook to keep track of your information or use the FitnessSyncer Uploader to upload your content into FitnessSyncer. This is also a great way to get started with FitnessSyncer. For more information, please see the Notebook section.
Adding Destinations
Once the data is available, you can start putting the data to work. Our Destination Tasks are intended to take action on your data. The most common is synchronization to another service. To get started on this:
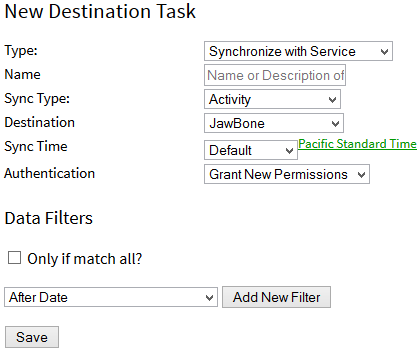
- On the Accounts page, click Add New Destination Task .
- Select the Synchronize with Service option as the Type
- Select the Data Type that matches your Source data you wish to synchronize. Remember that FitnessSyncer will only publish this type of data to this destination.
- Select the Destination you wish to publish data to. For Apple Health, you will need to do this from FitnessSyncer for iOS; for Samsung Health or Google Health Connect, you will need to do this from FitnessSyncer for Android.
- Depending on the destination, you may need to enter your username and password for that service here, or you may be redirected to the device or service’s website after saving the item to grant FitnessSyncer access to your information.
- Click the Save button. All other properties are not required, but you can learn more about them in Sync Destinations.
To try your first sync, click the Sync button near your Destination Task on the Accounts page. Depending on how much data you have, this can take a long time.
Best Practices
FitnessSyncer provides you with lots of flexibility and that can be overwhelming and some combinations may not make sense. Here are some best practices to keep in mind.
- Do not add a destination to FitnessSyncer Notebook unless this temporary. FitnessSyncer Notebook is intended for data that you do not have elsewhere online and will result in your account being hard to make sense of. It adds no benefits to you unless you a service is going away and you are removing that source soon.
- Prefer to have one authoritative source. Instead of mixing and matching your data from a variety of data sources, we recommend that you have one or two sources that you use as authoritative sources and have a set of destination tasks to distribute that data to other sources. Having each of your sources listed in FitnessSyncer will just make your account harder to use and can result in additional latency.
- Familiarize yourself with the tools. We provide a lot of different views into your data which can not only unlock some insights into your health and fitness journey, but can also help you spot anomalies; this FitnessSyncer Overview helps enumerate some of those. If you are just using us for syncing data to another platform, you should familiarize yourself with FitnessSyncer Stream or common troubleshooting tricks.